How to propagate pelargonium by cuttings?
Pelargonium is a universal plant, it can be grown both at home and in the flowerbed. This beautiful flower can be grown at home from seeds. But the fastest and most effective method of its propagation is cuttings.
Therefore, in this article we will learn all the intricacies of this process, and also consider the rules for caring for rooted cuttings. We will protect ourselves from mistakes in this interesting process. Also watch the helpful video.
Plant description
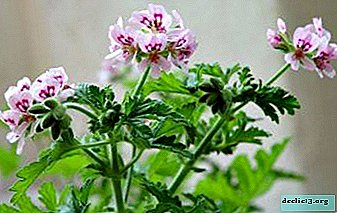
Pelargonium is a flowering plant of the geranium family. It was introduced from South Africa in the 17th century. For almost 4 centuries, English, French, and other breeders created new varieties. Therefore, the variety of this flower allows you to satisfy every taste.
Pelargonium has not only the beauty of flowers, but also many other useful, pleasant and healing properties:
- Volatile substances volatile substances purify indoor air.
- There are varieties that exude the aroma of apple, rose, or have no smell at all.
- Plant juice can help cope with a runny nose, and when instilled into the ear, it eliminates otitis media.
- In the past, ointment based on flower juice was used to get rid of lice.
- Plant juice can help with minor skin lesions.
- Inhaling the smell of pelargonium calms the nervous system and normalizes sleep.
- Plant extracts are used to treat skin diseases such as eczema, herpes.
- Oil is used in cosmetology.
- And many other cases.
Watch a video about the beneficial properties of pelargonium:
Breeding methods
Pelargonium can be propagated at home in two ways:
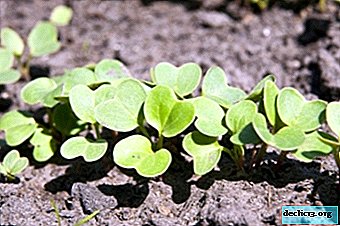
 Seeds. Moreover, the seeds of hybrid varieties must be purchased, and not collected from your plant. Hybrids are not able to produce seeds with the same characteristics as the parent plant.
If you had large fringed flowers, then from your own seeds of this plant you will get an ordinary flower with smooth petals and, possibly, smaller. Seeds are planted in late February - early March. Then grown, as usual, to adulthood.
- Cuttings. Pelargonium perfectly propagated by cuttings. Roots quickly and easily and after 4-6 months gives the first flowers. Cuttings can be carried out by combining it with spring or autumn pruning of the plant. The process is quite simple, and with a high probability you will get a new young plant.
 Seeds. Moreover, the seeds of hybrid varieties must be purchased, and not collected from your plant. Hybrids are not able to produce seeds with the same characteristics as the parent plant.
The basic rules of grafting
Like every process, grafting has its own rules:
- When is it better to cut? The time of the procedure is better to combine with pruning, it is most acceptable to do this in the fall. During the winter dormant period, the plant will take root and grow stronger. The cuttings planted in the fall, next year will begin to bloom almost on a par with adult plants.
- The soil in which the cuttings will take root should be light, moisture permeable. Peat mixed with either sand or vermiculite and peat tablets placed in a pot of earth are perfect for this purpose.
- Placement of cuttings is best done immediately in separate containers. This will reduce the risk of death of all seedlings from infection.
- It is strictly forbidden to create a greenhouse effect by covering the cuttings with a film! Plants can rot or die from a fungal infection.
Training
First you need to prepare the cuttings:
- Cut the apical shoots 7-10 cm long with 3-4 internodes with a sharp knife. The cut should be done at the internodes.
- Remove excess leaves, leaving 3-4 sheets at the top.
- Charcoal cut. You can use crushed activated carbon.
- Leave the cuttings to dry for several hours in a dark place. You can cut in the evening and leave until the morning, but you can plant in 1-1.5 hours.
- Cuttings are ready, you can start rooting!
Soaking in water
 Most varieties of pelargonium quickly take root in ordinary water. However, it is worth remembering that the Royal Pelargonium does not give roots in water, but simply rots. In other cases, you can just put the cuttings in the water until the roots appear, and then proceed to planting in the ground.
Water should be clean, room temperature. The cuttings are carefully placed in a plastic container with water so that a 1-2 cm cut is covered. If a few days before a week the roots do not appear, then the cut should be updated and the plant rooted in the ground.
Landing
In the prepared soil, we plant our cuttings in the grooves made by 3-4 cm, we press the soil to the shoot. The soil must be moist. We put a container with a shank in partial shade for a week. We constantly check the soil moisture, it should not dry out. It should not be poured either. Remember that you cannot cover the cuttings!
There is an interesting and easy way to plant cuttings, which prevents root decay:
- In the bottom of a 0.5-liter plastic cup, we make a hole, for example, with a hot nail.
- Insert a piece of lace into the hole. 4 cm of lace should be in a cup and 6 centimeters outside.
- In a 700-gram glass jar, pour about a glass of water. You can add rooting stimulants there.
- We install a glass on the jar, the water in the jar should not touch the bottom of the glass, and our lace-wick should be in the water.
- Pour fertile soil into the glass, mixed in equal parts with perlite.
- We plant a stalk.
- The soil surface is completely covered with perlite.
- Now you only need to ensure that there is water in the bank.
- Watering is not necessary at all, water flows through our wick constantly and little by little.
After planting, the plant takes root (learn more about planting and rooting pelargonium here). Pelargonium will take root within 1-2 months and increase the root mass. If the aerial part of the plant started growing, then the rooting was successful. During the rooting period, the plant can not be fed, flooded and placed in direct sunlight. The optimum temperature for rooting is 20-22 degrees.
Watch the video about the rooting of cuttings of pelargonium:
What to do after?
How to grow it right? When you understand that your pelargonium is sufficiently rooted, you should transplant it to a permanent place of residence. This will not have to be done by those who rooted the cuttings into a peat tablet in a pot of earth. And so what we have to do:
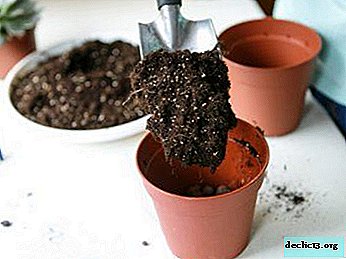 Prepare a clean container disinfected after other plants.
- Prepare fertile soil. From store mixes, if not for pelargonium, a mixture for begonias is suitable.
- If you are preparing the soil yourself, mix leafy humus, fine river sand and turf in a ratio of 2: 1: 1. The land must be prepared in advance and spilled, so that at the time of planting it had a normal structure.
- Lay a drainage layer in the pot: brick chips, small pebbles, etc.
- Lay a small layer of soil.
- Take out the handle with a clod of earth, this can be done with a tablespoon, and placed in the center of the pot.
- Fill the gaps at the walls of the pot with soil.
- Press the ground lightly.
- Water the pelargonium without touching the base of the stem.
- Leave the geranium in partial shade for a few days.
 Prepare a clean container disinfected after other plants.
After we take care, like an adult plant: moderate timely watering, top dressing, a well-lit warm place.
If something went wrong
There is always a chance that something will not work, the cuttings may not take root. Therefore, such moments should be foreseen in advance:
- If your cuttings have been standing in water for a week and there are no signs of roots, then you need to change the action plan. Make a fresh cut a little higher, dip in charcoal, dry and root in the ground, as already mentioned.
- In order not to be left with anything, do more cuttings than you want to get. If successful, you can always give them to someone.
- Water carefully, do not rush. Most pelargonium problems occur due to improper watering.
- Watch not only the temperature of the air, but also the temperature of the water and the earth in the pot. Often the soil in the pot on the windowsill is much colder than the surrounding area. From this, the roots cease to develop, they simply begin to rot.
- Be attentive to the condition of the shoots so as not to miss potential problems.
Conclusion
Propagation by cuttings and cultivation is a very simple and quick way to propagate your favorite pelargonium, which also preserves all the characteristics of varietal plants. In principle, this can be done at any time of the year if you want to.
And in general, pelargonium is an extremely diverse, beautiful, undemanding, healthy plant that can grow both on the street and at home. Not without reason, for centuries it has enjoyed such popularity!
Watch the video: How to Propagate Geraniums from Cuttings (November 2024).


-
Indoor flower violet Greenhouse effect and all about caring for her
Violet is one of the most popular and unpretentious house plants. The peculiarity of this flower is an unusually wide variety of varieties, each of which differs in its flower shape, color and color scheme. Among the many varieties, the appearance of the Greenhouse effect is very prominent. This plant is suitable for those who like bell-shaped flowers, as this variety is similar to large terry lilies of the valley. ... -

-

-