DIY homemade crafts: interesting ideas and workshops 2019
Sometimes, a laconic, strict and too ideal modern interior is so lacking a little charm, personality, atmosphere of the hearth. Needlework will help to rectify the situation. Beautiful gizmos, made by yourself, will fill the house with warmth and comfort, make the interior special, sophisticated and unique. For you, we have collected the most original ideas for 2018 with a step-by-step description and examples in the photo.
Bohemian rainbow wall decoration
This bright detail will significantly transform the interior of the hallway, living room or nursery. Making such beauty is easy, and the result is amazing!
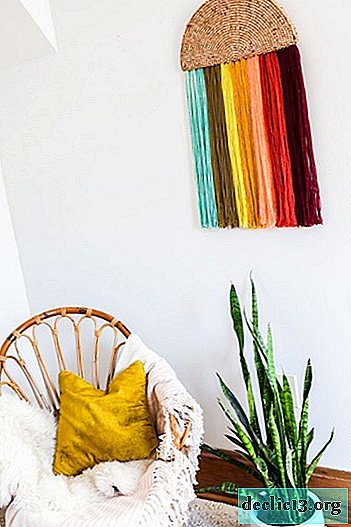
So you will need:
- round decorative napkin made of wooden beads;
- 7 skeins of yarn in your favorite colors;
- needle for sewing;
- white thread;
- scissors.

Step by step
1. Fold the cloth in half and carefully sew with a white thread.
2. Cut the yarn into equal length and volume strips, each of which is folded in half and tie the bending place with a thread of the same color.

3. Arrange the colors next to each other as you like.
4. Start sewing the strands from the center of the flat line of the napkin. Insert one side thread of the strand into the needle, carefully tighten it to the base of the napkin and sew along one of the sides. To prevent anything from blooming, leave a few centimeters of thread loose at the end, and then tie it to another strand.

5. Repeat this process with two bunches of the same color, and then with two bunches of the next color, etc.

6. To hang the product on the wall, make a loop of yarn by sewing it on the back.

Gorgeous rainbow decoration is ready!


Exquisite wreath-candlestick on the window
We offer to make a sophisticated, delicate, graceful wreath-candlestick with which you can decorate the window.


For work, prepare the following materials:
- a metal ring with a diameter of 25-30 cm;
- beautiful twigs with leaves;
- candlestick on a clip;
- thin wire;
- scissors;
- leather lace.

In the project, we used eucalyptus branches in the photo, but it is not easy to find eucalyptus here, so you can replace it with branches of any plants - fresh rosemary, willow, mint, spruce, arborvitae, etc. Now let's proceed:
1. If necessary, cut short twigs.

2. Cut a few pieces of thin wire about 5-7 cm long.

3. Attach the branches to the lower semicircle of the ring so that the roots look inward. Attach them with wire at the top and bottom.

4. In the photo, a candlestick with a clip. If this could not be found, take another small candlestick and attach the wire in the center of the metal ring. Twigs carefully mask the mounting location.

5. To hang the product, tie a leather lanyard, braid or ribbon, as in the photo.

Great window decor is ready!


Keep in mind, such a candlestick in the form of a wreath is more decorative. But even if you lit a candle, do not go far and for long - it is unsafe!
Decorative wicker panel made of paper
From the two most ordinary travel photos you can make a perfect unusual stunning wall panel. How? We will tell in the next master class.
 For such a panel, you can take images of any absolute theme. However, it is important to choose photographs or drawings so that one is background, and the second is more graphic and contrast (black and white).
- two photos or drawings in the same format, which must be printed with the fields;
- pencil;
- glue;
- metal ruler;
- stationery knife or scissors.

 Number the strips so as not to get tangled, and cut along the marked lines. For this, empty fields that were left when printing photos are just useful.
 2. In a contrasting photo, leave a slight indentation from one edge. When cutting strips do not reach the end. We cut the second picture into even strips with a width of about 1 cm. The resulting “fringe” will stay on the common edge.
 3. Start weaving one by one. To prevent the strips from moving apart, glue them periodically.
  Finishing weaving, the ends can be cut or wrapped. Insert the finished panel into the frame and enjoy the masterpiece!
DIY textile print
You can decorate home textiles with a cute print using the simplest means, for example, potatoes! Making original pillow covers is easy using a regular stamp cut from potatoes. Prepare:
- the fabric on which the print will be applied (cushion cover, dish towel, etc.);
- paint for textiles (several colors or shades are possible);
- two potatoes.

 2. Squeeze a small amount of paint on a flat surface so that it is convenient to dunk the stamp and the paint goes evenly.
 Tip: on separate shreds of fabric (or paper) make test patterns. So you can choose the best options.
 3. Choose patterns and stamp covers. For one product, you can use one drawing, but stamp them in different directions, as in the photo. And do not forget to put the newspaper inside the cover or under the cloth so as not to stain anything.
 4. Leave the fabric to dry for at least an hour.
 5. We fix the paint by ironing the covers on the wrong side at a sufficiently high temperature (in the “cotton” mode) for 2 minutes. Between the board and the cover, we lay additional fabric. The product is ready! Hand-made decorative pillows look very colorful.
 Floor lamp made of twigs
Leaf fall time, as soon as the trees prepare for winter, is a wonderful period for crafts from branches. Therefore, we advise you to use your leisure time with benefit by making a cozy lamp made of natural materials. And for this you need:
- branches, different in length and size;
- the basis for the future lamp (for example, a vase);
- wire with a bulb;
- shade;
- glue gun;
- acrylic paint, sparkles, brushes.


 3. Inside the glass vase, install the lamp in the lampshade.
 4. Glue the branches to the remaining fragment of the vase.
 5. We decorate the product with cones. Eco-style floor lamp is ready!
 You can leave the composition in its natural form, or you can continue to decorate:Option 1 - to give gray hair, randomly painting the twigs with white acrylic paint.

 Option 2 - New Year's. Paint the twigs with silver paint and glitter. Dress the lamp with rain and small toys and you will have a wonderful New Year composition.
 Option 3 - in the Scandinavian way. Ash pink is one of the most popular shades in the interior of the last few years. It is not necessary to paint all the branches; combine several tones, for example, pink, gray and white. Get an exquisite lamp with a Scandinavian character.
Hand-Marking
Marmorizing is a popular technique in needlework, when special acrylic paints are spread on the surface of the water, where various objects are lowered - from paper to wooden. In our example of marbling on dishes, nail varnishes (preferably slowly drying) are used as dyes. Materials:
- slowly drying nail polishes;
- glass or porcelain cup, plate, vase, etc .;
- disposable container;
- stick for stirring.

 2. Add water to the water. Hold the jar of varnish horizontally, closer to the surface of the water so that a drop of varnish does not immediately sink to the bottom. In contact with water, it will begin to blur and dry out. Therefore, literally in a few seconds you need to have time to form with the help of a stick stains for a marble effect. And you can let the paint yourself spread out in a thin layer.
 3. Dip the dishes in a container of water and varnish. Hold the container at an angle and twist around its axis, as if collecting the varnish film from the surface of the water. If you marmorize food utensils in this way, be sure to leave a place to touch the lips, i.e. top part, without varnish.
 Idea: try experimenting and applying several similar shades in layers, for example, red and dark orange. For greater resemblance to natural stone, work in gradations of blue and gray.
 4. Leave the finished products to dry. Drying time will take no more than 5 minutes. The convenience of such a technique lies in the fact that any imperfections in the process of work can be easily removed and started all over again - just keep the nail polish remover nearby. This decor is quite durable. Whether marble stains will withstand washing in a dishwasher is a moot point, but with a gentle hand washing they will certainly last until the next stain. If desired, in order to reliably fix the result, the product can be coated with aerosol transparent varnish.
More ideas for your inspiration are presented in the next photo collection.
Embroidery


Original wall decoration


Panel of shreds of different textures

Decorative fruit made of yarn

Ideas for the nursery


Colorful textile


Mat with LEDs

DIY vases


Chandelier and fixtures


Painting on dishes


Designer watches as an idea for a do-it-yourself masterpiece


Needlework is a real art to turn the most ordinary objects and materials into stunning works. A little skill, desire, creative imagination - and you will certainly be able to realize any of the ideas presented.

